
The hidden first layer
A complete painting, in greys.
A grisaille — from the French gris, grey — is a complete painting executed in one colour or a range of greys. In the classical method it goes down first, before any colour is applied, and serves as the structural foundation. Every problem of form, value, edge, and proportion is settled in the grisaille. The colour, applied later in transparent glazes and opaque scumbles, then only has to do what colour does best: render the warmth, coolness, and luminosity of life.
Get the values right and your colour will sing. Get them wrong and no jewel of pigment will save you. John Singer Sargent
01Why paint in two stages?
The eye can't judge two things at once. Asked to weigh value, colour temperature, hue, saturation, edge, and proportion all at the same time, even an experienced painter will fail.
The classical method separates these problems. The grisaille handles value and form. The colour layer handles temperature and hue. You're solving one big problem in two manageable halves — not all at once.
This is why beginners who try to paint a finished portrait alla prima from the first stroke struggle. They're attempting a vast synthesis. Better to build it in two passes: first the drawing in paint, then the colour over the drawing.
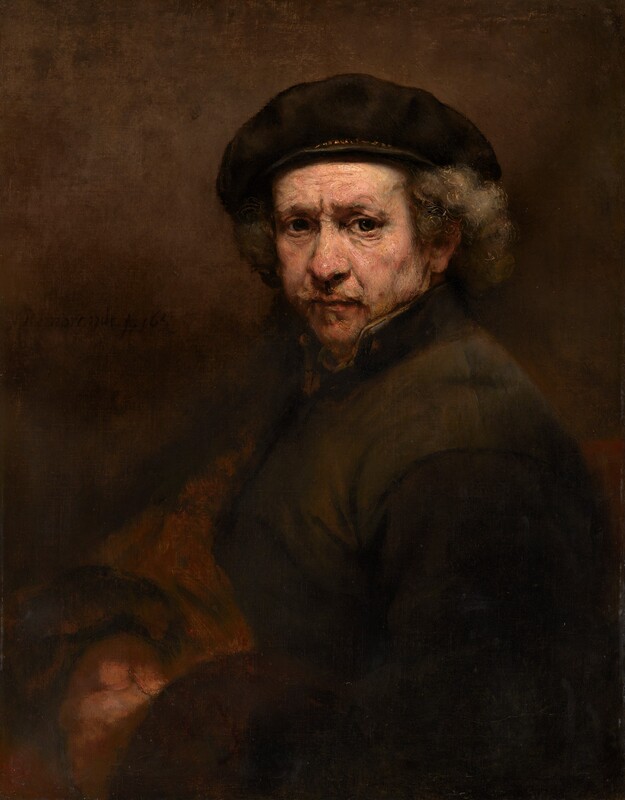
Rembrandt · Self-Portrait · c. 1659 · built on a warm monochrome underpainting
Master Painting Analysis
◆See the grisaille at work
Rembrandt’s self-portraits offer the clearest surviving evidence of the monochrome underpainting method. Click each highlighted area to see the technique revealed in detail.
Technique Analysis
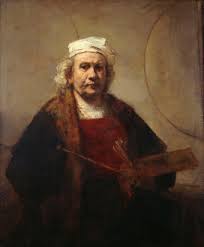
Self-Portrait with Two Circles
Grisaille · Value Modelling
The Tonal Foundation
The face is built on a warm raw-umber underpainting. The shadow side retains the translucency of thin paint; the lit forehead carries thick, opaque lead white. Thin darks, thick lights — the grisaille principle made permanent.
Squint until colour drains away. You will see the full tonal range — near-black to near-white — all resolved before a single colour glaze was applied.
02Four traditional grisailles
Verdaccio
A greenish-grey underpainting used by Italian painters from Giotto to Botticelli, particularly for flesh. Mixed from yellow ochre, black, and white, with a touch of red earth. The cool green hue makes the warm flesh tones glazed over it appear luminous by contrast.
Burnt umber
Used by Van Eyck, Rubens, and Van Dyck. Burnt umber thinned with turpentine, sometimes with a touch of black for the deepest darks. The white of the ground is left untouched for the lights. Dries quickly, holds a sharp edge, and forms a perfect surface for glazing.
Black & white (camaïeu)
Ivory black and lead white, no other colour. The most neutral and uncompromising. Used by Ingres and the French academic painters. If you can paint a head in pure black-and-white grisaille, you can paint a head in any palette.
Open grisaille
A thin raw-umber wash tones the canvas. Lights are built up in white; shadows are stated in burnt umber; the midtones come from the toned ground itself, glowing through both. The fastest method. Favoured by Velázquez.
03The grisaille process, step by step
- Tone the groundBrush the white canvas with a thin wash of raw umber diluted with turpentine. This kills the brilliance of the white — against which every value will look too dark — and gives you a middle-toned surface to work into. Dry overnight.
- Draw in paintWith a small bristle and burnt umber thinned in turpentine, draw the subject on the canvas. Same block-in, same plumb-and-angle measurements, same patient construction as graphite. Correct freely — a wet line wipes off with a rag.
- State the shadow massPaint the shadows as a single flat shape in burnt umber, slightly thicker than the line drawing. Paint up to the terminator (the light-shadow boundary) carefully — this edge won't be much disturbed by later layers.
- State the lightsLoad the brush with white tinted by a little of the warm ground colour. Lay the lights in with thick, opaque strokes — sculpted, not painted — building the form in three or four planes. The thickness of paint in the lights, contrasted with the thinness in the shadows, mimics how light actually strikes a real form.
- Refine halftonesGreys mixed from white and burnt umber are placed between light and shadow. The halftones must remain lighter than every shadow value. Edges softened where the form turns gently, sharpened where it turns abruptly.
- Dry, then leave it aloneThe completed grisaille is set aside to dry for at least a week, often much longer. You're forbidden to touch it. Patience now will be rewarded with luminosity later.
Paint the lights thick and the shadows thin. The thickness of the light layer holds the highlight; the thinness of the shadow layer lets the ground glow through, as a fire glows through smoke. Studio maxim, after Rubens
04The notan study
Before mixing any paint, make a small notan — a tonal study in two or three values that maps the largest light and dark masses of your composition. The word is Japanese, introduced to Western teaching by Arthur Wesley Dow in the early 1900s, but the practice is older than the word.
A composition that's sound in two values will be sound in twenty. A composition that isn't sound in two values cannot be saved by any quantity of refinement.
Squint.
Half-close your eyes until the colour drains from the subject and only the value remains. The masters did this constantly. It's the single most useful habit a representational painter can form, and it's free.
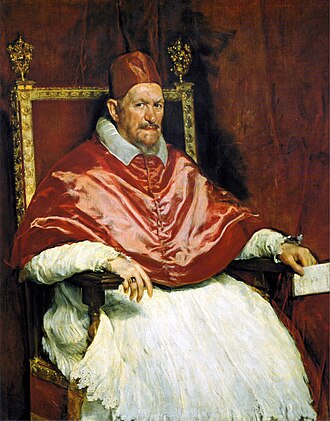
Velázquez · Pope Innocent X · 1650 · an open grisaille under a few decisive colour passes
05Common faults
Shadows too dark
Beginners almost always paint shadows as black holes. Look again: there's light in every shadow, reflected from the surrounding world. Most shadows on a head in ordinary studio light are no darker than middle grey.
Lights too light
Reserve the white of the tube. Only the highest highlight — a tiny spot on the brow or the tip of the nose — is pure white. Every other light has at least a touch of grey.
Halftones competing with shadows
The most common fault. A halftone in the light is allowed to creep down to the value of a shadow, and the form goes flat. Restate the halftone lighter. Keep the families separate.
Edges all the same
Vary your edges. A turning form has a soft edge; a contour against the background has a sharper edge; a hard form meeting light has a sharp transition; a soft form has a gradual one. An uninflected edge is a dead edge.
A first exercise
Set a single white egg on a sheet of grey paper, lit from one side by a north window. Tone a small panel with raw umber. When dry, paint the egg in burnt umber and white, observing all the principles above.
Spend at least three sessions on it: one for the drawing, one for the shadow mass, one for the lights. When you can render the egg convincingly — round, weighty, sitting honestly on the paper — you'll have done in oil what a cast drawing does in graphite. You're ready for the colour layer.